Fixing Arduino bootloaders
Refreshing my stock of Arduino Nano and Pro Mini clones from AliExpress, I got some with weird or broken bootloaders. This article details how that can be fixed. I think I’m mostly writing this for myself in the future.
Flashing AVRs
Bootloaders in AVR
Bootloader is a second, smaller firmware (beside the application firmware), which allows the microcontroller to program its own flash memory. This may sound mysterious, but there’s nothing so special about it.
On the ATmega328P used in most smaller Arduinos, the bootloader is user-programmable. Some microcontrollers, like the ESP8266 or ESP32, have the bootloader burned in ROM right from the factory and it can’t be changed. On the ATmega328P, the bootloader is localed at the end of the flash memory.
The actual bootloader isn’t much different from a normal firmware. AVRs have instructions for reading (you know this from <avr/pgmspace.h>) and writing the flash memory. That’s the basis of a bootloader - it receives bytes over UART and stores them in the program memory.
Arduino bootloader variants
The old, classic Arduino bootloader waits 1 second after power on to see if anyone tries to program it over the UART. This can be annoying, so a new bootloader was created - Optiboot. Optiboot runs the 1 second delay only after a hardware reset (using the reset button), so it doesn’t wait after a simple power on. Further, it’s faster and much smaller than the old bootloader, so you have more program memory left for the application firmware. Neat!
Optiboot is so good, it’s now used on new official Arduino boards. However, who would buy an overpriced Arduino board if you can get the same thing on AliExpress? Except … yeah, you can get a broken bootloader or even no bootloader at all. You are here 🔴
Fuse bytes
The bootloader’s size and whether it should be used at all is selected by “fuses”. These are persistent configuration registers, which define things like the clock frequency, whether to use an external crystal, code protection against readout etc. The datasheet has a good overview of fuses. I also found a good online fuse calculator you can use to configure fuses interactively.
If your bootloader doesn’t seem to work, check that you enabled it! The fuse bit is called BOOTRST. Don’t ask how I know …
External programmers
Atmel AVR (the family of microcontrollers ATmega328P is a prominent member of) can be programmed externally, without a bootloader. This is how the bootloader is loaded for the first time and how you can rescue a “bricked” chip. The usual method is ISP, in-system programming using SPI. When you really mess up, the chip can be salvaged using “high voltage parallel programming”. The high voltage in question is 12 volts. HV programming requires a dedicated programming tool, whereas ISP can be implemented using an Arduino.
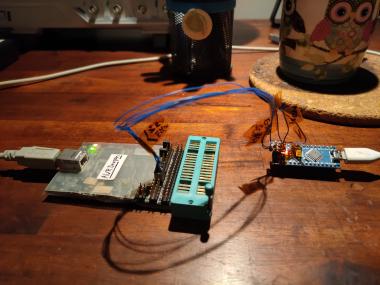
Flashing a bootloader with AVR Dragon
I have an AVR Dragon, which supports ISP, HW programming, DebugWire and JTAG (I only ever used ISP though). It’s not supported by the Arduino IDE - which makes little sense, since the IDE uses avrdude for its flashing, and avrdude supports AVR Dragon. It’s just not in the menu.
AVR Dragon (at least my version) is somewhat flaky and unreliable on Linux, but it mostly works. I used AVR Dragon to program a new bootloader to my new Arduino Nano’s.
To use AVR Dragon, this udev rule may be useful (46-avr.rules - source).

Programming Arduino Nano with AVR Dragon
AVR Dragon worked great for Arduino Nano, but it didn’t work for the new Pro Mini’s I received. I have no idea why.
Here’s how I burned Optiboot (optiboot_atmega328.hex):
# Settings:
# LFUSE: no ckdiv, no ckout, maximum settle time, external 8MHz crystal
# HFUSE: smallest bootloader (optiboot uses 512B = 256W), bootloader enabled
# EFUSE: Brown-out level set to 1.8V
# LOCK:  disable bootloader overwrite from app section

avrdude -p m328p -c dragon_isp \
    -U lfuse:w:0xff:m \
    -U hfuse:w:0xde:m \
    -U efuse:w:0xfe:m \
    -U lock:w:0xef:m \
    -U flash:w:optiboot_atmega328.hex
This sets the lock fuse to lock the bootloader sector to prevent accidental overwrite from application code - but unless you mess with SPM, that’s unlikely to happen.
Flashing a bootloader with another Arduino
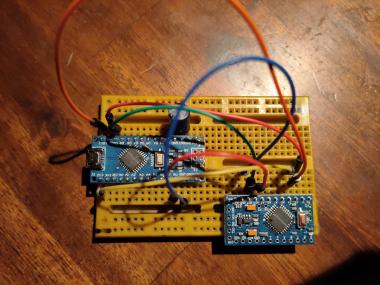
As I mentioned, ISP can be done using an Arduino. I followed this guide and got it working on a breadboard.
Here is the firmware I programmed to the Nano, the example “sketch” with some small edits: ArduinoISP.ino
Wiring is as follows (Programmer -> Target):
- D12 -> D12
- D11 -> D11
- D10 -> RST
- GND -> GND
- 5V -> VCC
- D13 -> D13

Arduino Nano used as ISP programmer to butn a new bootloader to a Pro Mini
There’s some gotchas / tips:
- To program the ArduinoISP sketch using a previously programmed bootloader (such as Optiboot), set the programmer in the ArduinoIDE’s menu to “ArduinoISP”. The capacitor mentioned in the following steps must NOT be present while you do this!
- To use your newly programmed Arduino as a programmer, change programmer to “Arduino as ISP”. Yup, not confusing at all. Then click Burn bootloader in the same menu. This will install Optiboot.
- You need a large capacitor between RST and GND on the programmer Arduino. I used 220uF/25V I had lying around and it worked, so the recommended size of 10uF is not so critical. Flashing invariably failed without the cap. If someone can explain to me how this works, please go ahead.
This whole ordeal took me some 5 hours to figure out, but in the end I think I have a pretty easy to follow guide for the next time … and eight ATmega328P boards with Optiboot for future projects … projects which will most certainly NOT use the Arduino IDE or C++

