Getting started with STM8 on Linux
In the previous article, we had a look at the cheap STM8 board from eBay and the ST-Link dongle you need to program it. Now it’s time for some action!
Setting up the environment
Literature & examples
It’s always a good idea to start with some reading.
There’s a wealth of free materials provided by ST about our chip (STM8S103F3). The page also lists all the main features of the microcontroller, if you want to have a look.
Another recommended reading is the SDCC manual, if you chose to follow my steps and use it. There’s some quirks and special syntax you might want to be aware of.
Programming software
You’ll need two essential pieces of software to work with the STM8 on Linux:
- stm8flash, a utility for interfacing your ST-Link dongle
- Package: aur/stm8flash-git
- GitHub: vdudouyt/stm8flash
- SDCC, a compiler
- Package: community/sdcc
- Home page
There’s a bunch of other compilers and tools provided by ST, but they’re all for Windows. You may have some limited luck with Wine, but it’s probably not worth the pain.
If you plan to use your ST-Link for STM32 development as well, install community/stlink.
You may or may not need the following /etc/udev/rules.d/49-stlinkv2.rules. I copied it from
somewhere, but forgot where.
# stm32 discovery boards, with onboard st/linkv2
# ie, STM32L, STM32F4.
# STM32VL has st/linkv1, which is quite different

SUBSYSTEMS=="usb", ATTRS{idVendor}=="0483", ATTRS{idProduct}=="3748", \
    MODE:="0666", \
    SYMLINK+="stlinkv2_%n"

SUBSYSTEMS=="usb", ATTRS{idVendor}=="0483", ATTRS{idProduct}=="374b", \
    KERNEL!="sd*", KERNEL!="sg*", KERNEL!="tty*", SUBSYSTEM!="bsg", \
    MODE:="0666", \
    SYMLINK+="stlinkv2_%n"

SUBSYSTEMS=="usb", ATTRS{idVendor}=="0483", ATTRS{idProduct}=="374b", \
    KERNEL=="sd*", MODE:="0666", \
    SYMLINK+="stlinkv2_disk"

SUBSYSTEMS=="usb", ATTRS{idVendor}=="0483", ATTRS{idProduct}=="374b", \
    KERNEL=="sg*", MODE:="0666", \
    SYMLINK+="stlinkv2_raw_scsi"

SUBSYSTEMS=="usb", ATTRS{idVendor}=="0483", ATTRS{idProduct}=="374b", \
    SUBSYSTEM=="bsg", MODE:="0666", \
    SYMLINK+="stlinkv2_block_scsi"

SUBSYSTEMS=="usb", ATTRS{idVendor}=="0483", ATTRS{idProduct}=="374b", \
    KERNEL=="tty*", MODE:="0666", \
    SYMLINK+="stlinkv2_console"

# If you share your linux system with other users, or just don't like the
# idea of write permission for everybody, you can replace MODE:="0666" with
# OWNER:="yourusername" to create the device owned by you, or with
# GROUP:="somegroupname" and control access using standard unix groups.
Library files
SDCC supports STM8, but for licensing reasons (booo, ST!), the Standard Peripheral Library (SPL) is missing.
Someone developed a patch that makes the SPL compatible with SDCC, available here: github.com/gicking/SPL_2.2.0_SDCC_patch. There’s an AUR package that attempts to install it in the SDCC libraries folder (aur/stm8-spl-sdcc), but alas the zip with the SPL files is login & EULA-click protected (booo again, ST!).
Getting the package to build is frankly quite arduous.
Download the SPL
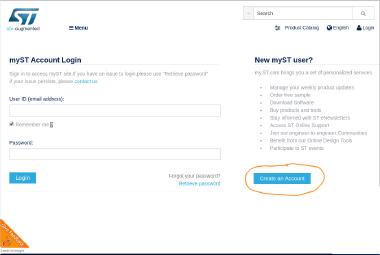
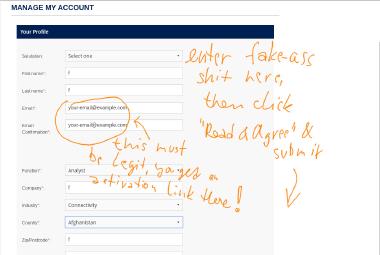
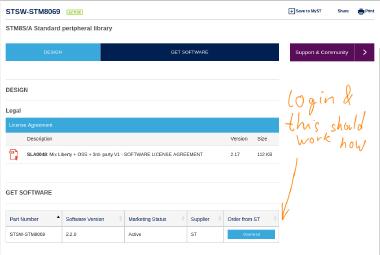
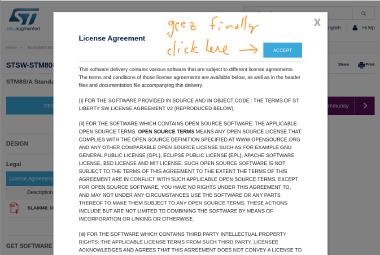
First, you have to wrestle the SPL zip from the evil corporate’s claws.
I made an illustrated guide for that:
Patching
After you downloaded the SPL archive, we have to patch it to work with SDCC, as it’s made for non-free compilers such as Cosmic. Cosmic can be obtained with some effort for free by sending an e-mail request, but it’s Windows only.
Let’s patch:
- Download the AUR package, perhaps using
cower -d stm8-spl-sdcc - Drop your hard-won
en.stsw-stm8069.zipnext to the PKGBUILD and rename it tostsw-stm8069.zip. The hash should match. - Run
mapekpgandsudo pacman -U <the xz file>
Non-Arch users can just apply the patches manually.
If you’re not fond of installing stuff like this in system directories, you can
simply copy the patched SPL from src/STM8S_StdPeriph_Lib and do as you see fit
with it (perhaps drop the libraries/STM8S_StdPeriph_Driver folder into your project).
You can also grab the example Makefile from src/STM8S_StdPeriph_Lib/Project/STM8S_StdPeriph_Template/SDCC.
It needs some tuning, but gives you a pretty good starting point.
Your first project
At this point you should have a working dev environment and can start experimenting with the board.
To get you started, here’s a sample project. To make things even easier, here’s a pre-built output HEX you can directly flash should you have trouble compiling and wanted to skip this step for now.
Adjust the SPL paths in the Makefile to suit your setup and you should be able to build
it by just running make.
$ make
sdcc -mstm8 -lstm8 --opt-code-size -DSTM8S103 -I./src -I/usr/share/sdcc/include/stm8/  -DSKIP_TRAPS=0 -c ./src/stm8s_it.c -o STM8S103/stm8s_it.rel
sdcc -mstm8 -lstm8 --opt-code-size -DSTM8S103 -I./src -I/usr/share/sdcc/include/stm8/  -DSKIP_TRAPS=0 -c ./src/main.c -o STM8S103/main.rel
sdcc -mstm8 -lstm8 --opt-code-size -DSTM8S103 -I./src -I/usr/share/sdcc/include/stm8/  -DSKIP_TRAPS=0 -c /usr/share/sdcc/lib/src/stm8/stm8s_gpio.c -o STM8S103/stm8s_gpio.rel
sdcc -mstm8 -lstm8 --opt-code-size -o ./STM8S103/STM8S103.hex STM8S103/stm8s_it.rel STM8S103/main.rel STM8S103/stm8s_gpio.rel
SDCC can’t compile multiple files at once, which is why it needs multiple steps. First,
each .c file is compiled to .rel (SDCC’s version of .o, more or less). In the last
step, all those .rel files are put together and the final assembly is produced in the
output folder (STM8S103/).
Getting organized
The source files are messy, mostly because of the excessive comments, but the do-something
part of main.c is quite clear. It’s based on the original ST-provided template project,
which is where the comments come from; the STM32 SPL suffers from a similar issue. Feel
free to clean it up as you like.
You might also opt to copy the SPL files straight into your project and do some cleaning
there–namely remove the whole “assert” nonsense (you should be able to simply #define
it as no-op in stm8s.h, then you save some FLASH bytes by removing the error messages).
To get a gist of SPL’s features, read through the library files and look for things that interest you. They’re grouped by peripherals, so you immediately know where to look if you need something (eg. SPI, UART, I2C…).
ST ships the library with 6~MB of documentation in a .chm file, so if you figure out how
to open it, that might be useful as well. It seems to be just compiled doxygen though.
Flashing your STM8
Wiring it up
Out of the factory, each board is flashed with a blinking demo, so you should see it start blinking as soon as you connect the USB. We won’t be using the USB though, so unplugit again and prepare your ST-Link and the connection cable that came with it.
You’ll also need to solder some headers to your STM8 board, at the very least the programming header (opposite of the USB). Both the dongle pins and the programming header are clearly labeled, so you shouldn’t have any issues.
Here’s what your setup should look like:

First-time wipe
The board should start blinking immediately. The first step though will be to wipe the chip, since the factory-loaded firmware is read-protected and you can’t do anything while it’s locked down.
To unlock the chip, use the -u flasher option (for more info, run stm8flash -h):
$ stm8flash -c stlinkv2 -p stm8s103f3 -u
Determine OPT area
Unlocked device. Option bytes reset to default state.
Bytes written: 11
The board will stop flashing, you just bricked it. Oh no! But we’ll fix that promptly.
Uploading firmware
You can now upload your own firmware using make flash, or if you downloaded the HEX file
manually:
$ stm8flash -c stlinkv2 -p stm8s103f3 -s flash -w stm8_blinky.hex
Determine FLASH area
Writing Intel hex file 655 bytes at 0x8000... OK
Bytes written: 655
The board should immediately start blinking again. Try adjusting the delay time and see how the blinking speed changes. You’re in charge now ;-)
Closing thoughts
I hope this 2-part series helped you get started with the STM8. You should now have a working compiler and upload tool, know how to use the dongle, and have some idea about the microcontroller.
I plan to spend some time playing with the STM8 and hopefully post some follow up articles about my new discoveries. Until then, happy hacking!


